Legacy Feb. 2nd 2021
Team Name
SM LEGACY
Location
Mission Sports park
Date
02/02/2021
Start Time
5:00
End Time
7:10
EARLY ACTIVITY DRILL STARTS AT 4:45 (BELOW GOLD)
PRACTICE STARTS AT 5:00 (BELOW BLACK)

~ SEE "EXECUTION KEYS" BELOW FOR AGE-SPECIFIC SUGGESTION LIST ~ The Dynamic Warm Up is today's warm up routine. Gone are the days of standing in a...Read More
 Notes:
25/50/75/100 Sprints, Side to side shuffle, Side to side Jumping jacks, Walking lunges, Karaoke, High Knees, Butt kickers, Back pedal (catch teammate with hands on upper shoulders), Lead breaks (8u) concentrate on exploding first 4 steps(4)
Change of Direction is an Early Baserunning drill working athleticism. Execute these movements to finish up the warm up and get heart rates up. While...Read More
Notes:
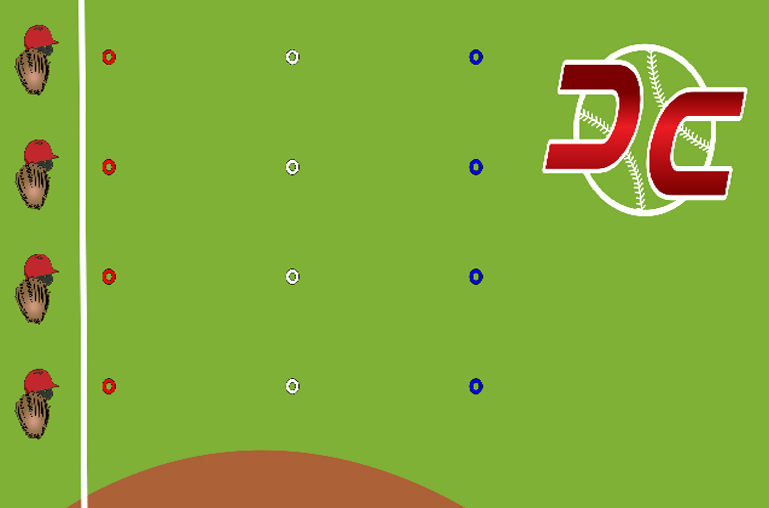
Throwing Progression is a series of three drills: Two Knee Catch, One Knee Catch, and Feet in Concrete. All three are supported in the DC Library with...Read More
Notes:
Execution – Athletes are organized into pairs, with one athlete on the foul line and the other extending into the outfield. Depending on age and ability, begin catch play with organized and controlled throwing reps. Throwing only on a coach’s verbal, athletes begin with Two Knee Catch for 8-10 repetitions (focus = glove). Next, is One-Knee Catch where focus shifts to the throwing arm (and reinforcing glove arm execution). After another 8-10 total throws, athletes are to stand up for the third drill: Feet in Concrete (standing, no stride). Once completed, move into regular long toss to build arm speed/strength and finish with an execution movement. DC KEYS Know Age & Ability – Playing catch on two knees can be dangerous. Athletes can’t move out of the way because their feet are essentially taken away. But that’s the point! We want the athletes to focus on their gloves and do so with easy tosses. Just be careful. Coaches Note: DC Practice Plans take this into account and often times start with Feet in Concrete. This is done so youngest ages start on their feet, improve their ability to play catch, and then move down to one or two knees. Structure, Structure, Structure – Even if different drills, follow a structured game of catch. Coach throwing! It’s important. Create Focus – THIS is how focus is “encouraged.” Provide no alternative with your leadership and practice structure. Set Up – Use your help to lower athlete-to-coach ratio, fill all pockets with baseballs, and put brothers/sisters/uncles/dogs behind the lines to chase overthrows and errant baseballs.
Ground Ball Quick Catch is a simple and effective drill to run during Quick Defense. It helps to develop basic hands and feet baseball-athleticism and...Read More
Notes:
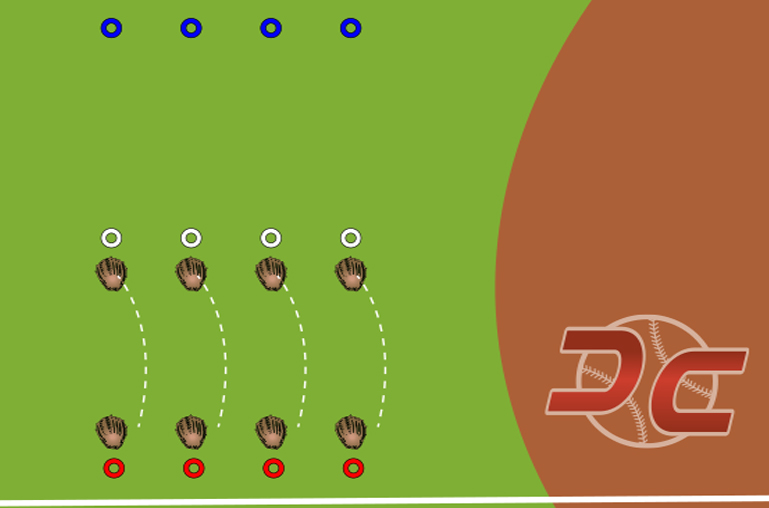
EXECUTION – With athletes at the warm up cones, the goal would be for each coach to have a maximum of four athletes. That said, coach rolls a ground ball, tosses a quick catch, ground ball, quick catch… rotate. Work through the line 3-4 times so that each athlete has gotten ample repetitions and move into Drills / Station Instruction. Ground Ball Coaching Verbals: Fielding triangle, alligator hands, POP footwork. Quick Catch Coaching Verbals: Handcuffs, footwork, reset. DC KEYS Control Pace and Difficulty – A coaches speech, actions, and body language can help assist calm execution (subtle, even subconscious introduction to performance under pressure) Coach Up/Down – Do this by requiring fundamental execution, moving their feet, or adjusting pace Program It – DC challenges you to insert GBQC when appropriate. Can you follow up ground ball instruction or support infield training with this short activity?
WATER BREAK (5min)
Stations (Groups rotate halfway through block)
Fundamentals: Bunting
 5:35-5:50
  15 Minutes
5:35-5:50 15 Minutes
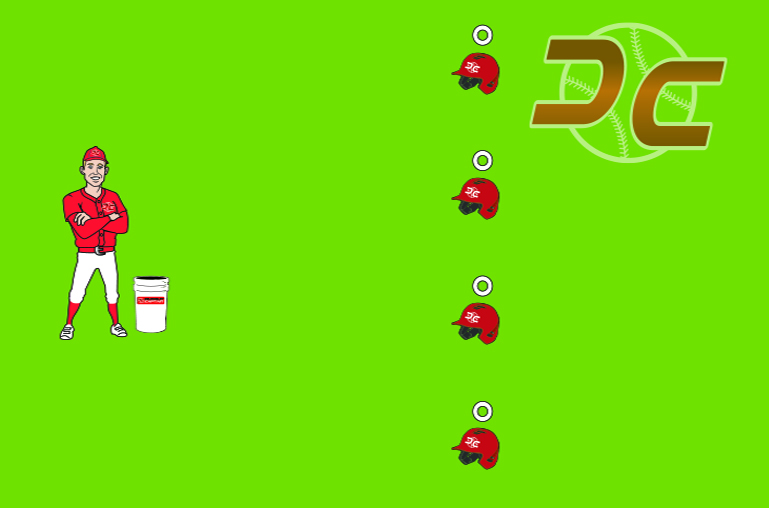
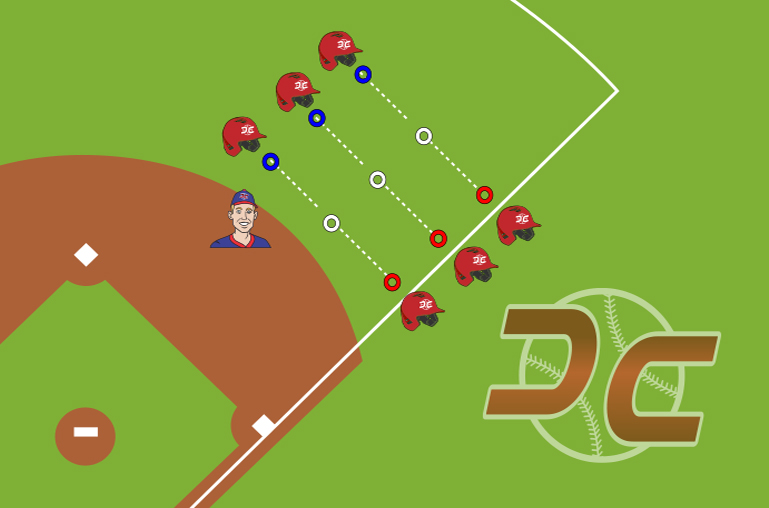
Bunt StationEXECUTION – Place six “individual-cones” in a line for teaching and start the drill there. Discuss first the concepts of a sacrifice bunt as compared to a bunt for a base hit. Next, review the fundamentals of bunting technique (see below). Finish by moving into bunt repetitions, and give each athlete two times at bat. Use a throw-down home plate and a cones for baselines to create a bunting “field.” Begin the drill with all athletes at a cone (each has bat), and review the steps to a proper bunt. Keep in mind this is for the right-handed bunter: Pivot Back Foot & Bend Knees – “Squish bug” and get low to see the ball. Feet don’t open up as this exposes the chest and leaves athlete vulnerable to being hit and injured. Top hand (RH) – Moves up to base of barrel in a “Turtle Bite” position. No fingers are exposed on the front of the bat which avoids being smashed between ball and bat. Bottom hand (LH) – Moves up the bat tape comfortably. Bat Head Up – Attempt to keep barrel slightly above hands to promote ground ball off the bat. Drooping barrel may result in popping up the bunt. As a coach, take a knee and toss darts into the strike zone. Athletes rotate from on-deck, to live bunter, to defense (around the bunting infield). Each athlete will bunt 5 baseballs and then rotate. DC KEYS Knees to the Ball – Bend the knees to stay with the ball. Athleticism and coordination take over at contact. “Catch” the Pitch – Use the barrel of the bat to catch, or soften, the baseball at contact. Distance Marker – Use a foul line, or cone-line, as a distance marker. Athletes work to keep the ball from crossing that line! Teach! – Bat angles and types of bunts (ex: show early on Sacrifice Bunt).
2 Lines, 1 Coach
5:50-6:00 10 Minutes
5:50-6:00 10 Minutes
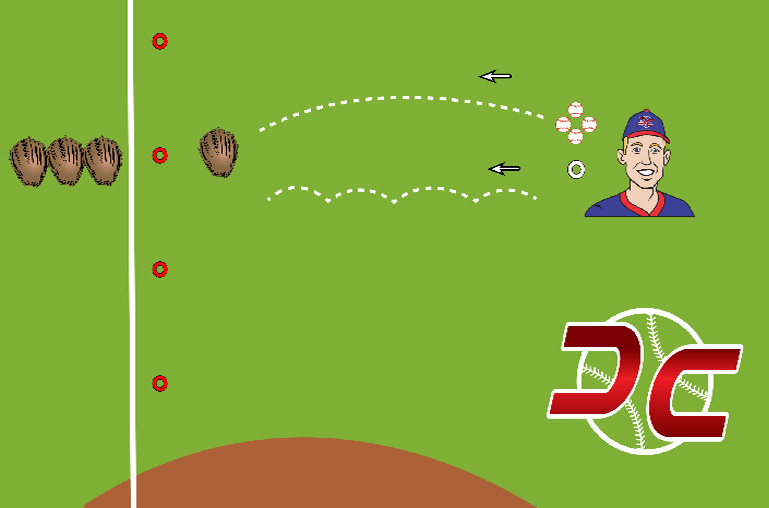
2 Lines, 1 Coach is a simple name for a simple drill. Options include running this drill as an Early Activity, or during station instruction. Coach has discretion to insert whatever instruction is appropriate for both the athletes… and the operator 🙂 If you don’t know ground ball instruction, just swing away and get the athletes ground balls – hello truck twists! Note: If offered during Early Activity, do so without throws as this is before the athletes have warmed up. EXECUTION – Divide the athletes into two lines, allowing for maximum repetitions while keeping as many kids as possible active. Consider positioning the ground ball lines to involve actual 2B and SS infield positions. DC KEYS Mass Reps – Roll them, hit them, alternate ground ball reps to each line and let them rip! Q: Throw vs. Ball Pile? – A: When are you running the drill? Pre-practice = no throw. Game Like / Compete – Add baserunners WITH HELMETS and use a coach (adult) as receiver.
WATER BREAK (5min)
Stations (Groups rotate halfway through block)
Bag Man & Relay Man
6:05-6:15 10 Minutes
6:05-6:15 10 Minutes
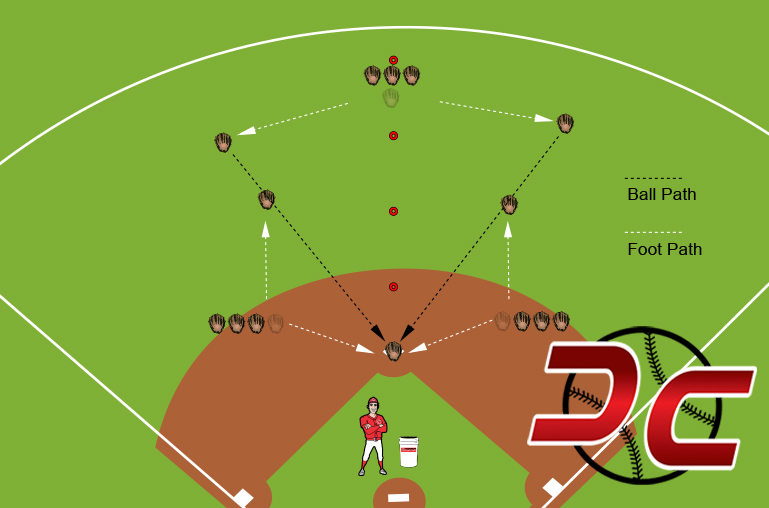
EXECUTION – Distribute athletes evenly in centerfield, shortstop, and second base areas. Place several cones in straight line from the cut of the infield grass directly behind 2nd base to the centerfield fence. Roll, toss, or hit ball into centerfield and have athletes execute proper Cut & Relay to the second base bag. Rotate clockwise after each play, from centerfield to shortstop to second base. When instructing roles and responsibilities, use the following keywords: Relay Man – The infielder closer to the ball (ball is on MY side of the centerfield cone line) Bag Man – The infielder farther away from the ball (ball is on the OTHER side of the centerfield cone line) Recognition of responsibilities – Be patient, this takes time! Think on the fly: “Am I closer to the ball? Then, what is my role?” Positioning – Relay man positions himself in a straight line between baseball and bag. Bag Man in straddle position so sliding runner goes between legs. Execute – Proper Cut & Relay (or Slap Tag & Show) Big X – Make a big X Be Vocal – Be loud (outfielder CANNOT miss you) Turn Gloveside – ALWAYS turn to glove (no exceptions while learning) DC KEYS Relay Man – Big X / Vocal / Turn Gloveside… Positioning Bag Man – Coaching details of tag play @ 2nd base (straddle, swipe, show) Redo Button – Stop the action at any time and force proper execution / feel Involve All – Have an idea of which athlete takes the throw and which athlete takes the bag. Ensure ALL do BOTH roles. If you see Johnny at 2nd base and he DOESN’T get the ball… make sure he DOES when he gets to shortstop.
Double Play Feeds 2B
6:15-6:25 10 Minutes
6:15-6:25 10 Minutes
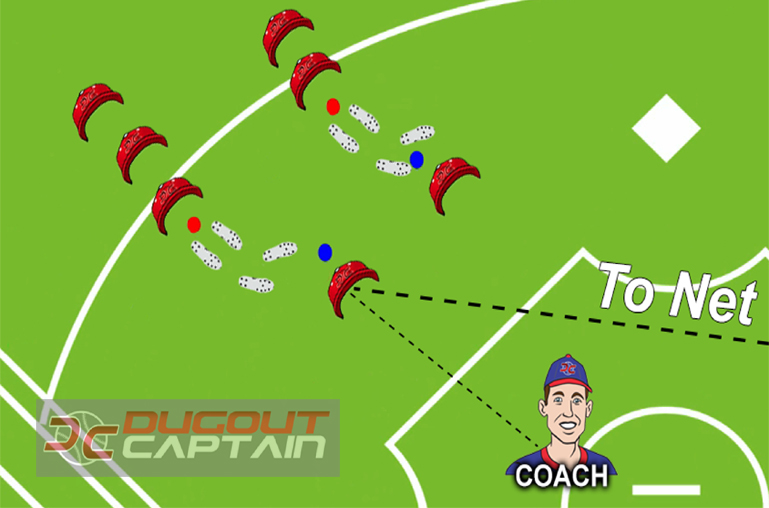
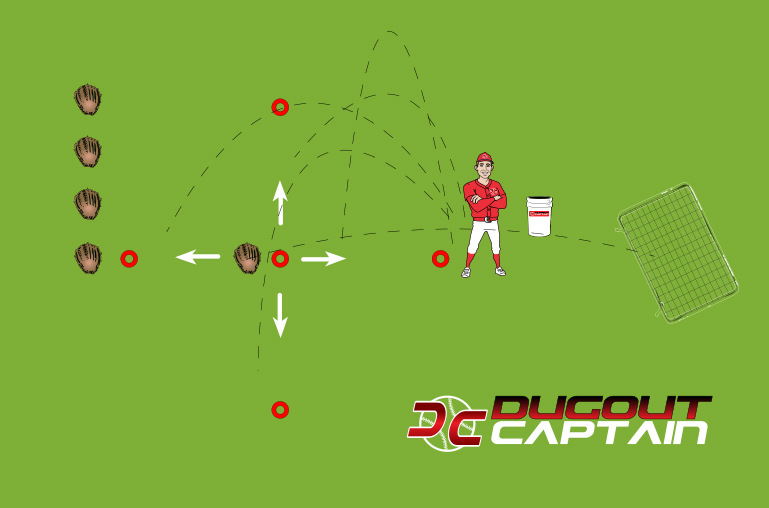
XECUTION – This drill is run at the second base area using a catch net and two cones. The line will form behind the back cone, while the ‘live’ athlete will step forward to a second cone. All feeds will be made to the catch net. Repetitions – With the athletes in a single line, roll ball to athlete’s right side. Instruct the players to field the baseball, separate the hands, and flip to throw net. They will follow their underhand toss and jog around the catch net before returning to the line at the back cone. Teaching the Underhand Flips – Rule: Ball to second baseman’s right = underhand flip ( moving CLOSER to bag ). Field the ground ball, crossover with the left foot, and step into the flip – a right-handed underhand toss. To expand, breaking from the fielding triangle, athletes are to use a stiff wrist, follow through with the hand high above the head, and attempt to toss a knuckleball. Using a stiff wrist and a high follow through “softens” the feed and helps to create an easy-to-handle feed. Work through the line slowly at first, and then increase pace to get each athlete 5-7 reps. Have each athlete jog around the catch net after each feed to work on creating momentum towards 2B and smooth, predictably movements. Teaching the Overhand Dart – Roll ball to athlete’s left side and have them field baseball, pivot feet, and deliver a strike to catch net at the 2nd base bag. Rule: Ball to 2B left = overhand dart ( moving AWAY from bag ). The feet athletically replace themselves in a jumping motion called a Reverse Pivot. Instruct the athletes to get the feet turned all the way around into a throwing position towards 2nd base. With this move, the athlete executes a fielding triangle to receive the ground ball, separates the hands, and “Pops!” the feet). Work through the line slowly at first, predictably rolling the ground ball so that the athlete moves AWAY from the bag. Backhand Flip (*advanced*) – If appropriate, challenge the athletes to use a backhand flip feed. Keeping the thumb underneath the baseball, the hand forms a “C” shape. Step towards the shortstop with the right foot while attempting to toss a knuckleball. Follow through with a high hand. Either / Or Repetitions – Coach’s verbal = “BE AN ATHLETE” Explain that infielders must be “athletes” when a ground ball is hit right at them. This type of ground ball presents a decision on which feed to use (overhand vs. underhand). Variables to consider are the pace of groundball and the defenders proximity to bag. Can the athlete create an underhand feed by surrounding the baseball and working towards the bag? In the end, infielders must play the game and get a feel for which feed is appropriate. DC KEYS Easy Ground Balls – Roll rather than hit ground balls to allow athletes to focus on the skill of feeds. If needed, pick up pace of drill, not necessarily the pace of the ground ball. Toss a Knuckleball – Use a stiff wrist, open the hand at release, and follow through high to ‘soften’ throw and eliminate an active wrist. Follow your Toss – Athletes are to continue around the net to encourage body movement on feed. Great Plays – When appropriate (at the end of drill), have fun with tosses. No crossover step feed (open underhand feed), backhand flip (toss the C), jump pivots, etc. Kids LOVE this!!
Olympics – Outfield
6:25-6:35 10 Minutes
6:25-6:35 10 Minutes
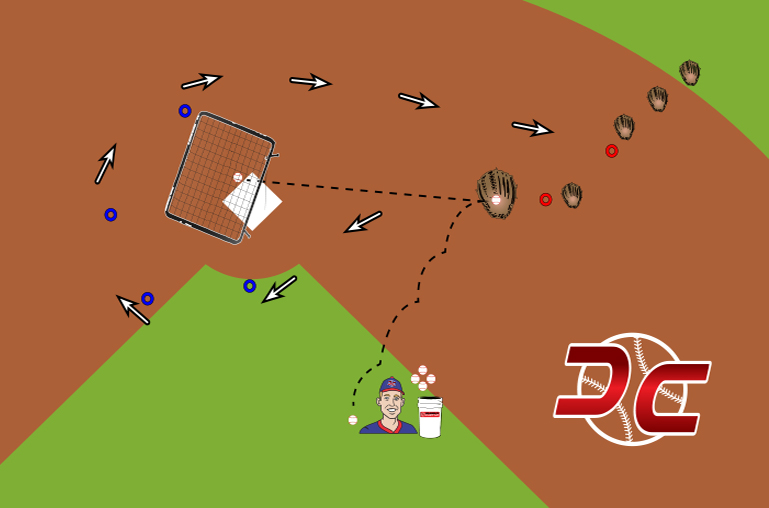
EXECUTION – The Olympics – Outfield Drill is run anywhere in the outfield. Place three cones down in a straight line, each 10 yards apart. Live athlete will start in the middle cone and work fly balls to three locations: Left / Right / At ’em (in or out). Work through the line twice, so each athlete will get two sets of three fly balls. There are four possible points for EACH fly ball: Footwork – Dropstep and crossover footwork. Effort – Go hard and give best effort. Catch – Point earned for a clean catch. Accurate Throw – One point earned if ball is thrown into the catch net. Award points on a clean field and accurate throw to a catch net set up in front of the outfield fence (to stop overthrows). To keep a running total for each athlete, have the athlete yell out his/her score after each round. DC KEYS Encourage Points – Throw, rather than hit, fly balls and shorten the distance to the throw net if needed. Get Through the Line Twice – Take the highest total per athlete – 12 points possible per round if three fly balls used. Positive Competition – Teach that you CAN compete to win and NOT root against an opponent. Focus on YOUR process as a competitor – be the best you! CLOSING – Process vs. Results The Olympics, and this drill in particular, is a great opportunity to teach a focused approach on what you CAN control as an athlete. Handle your business, control your wandering thoughts, and let the results speak for themselves. Focus on competing to do your best!

Team D – Bunt Defense
6:50-7:00 10 Minutes
6:50-7:00 10 Minutes
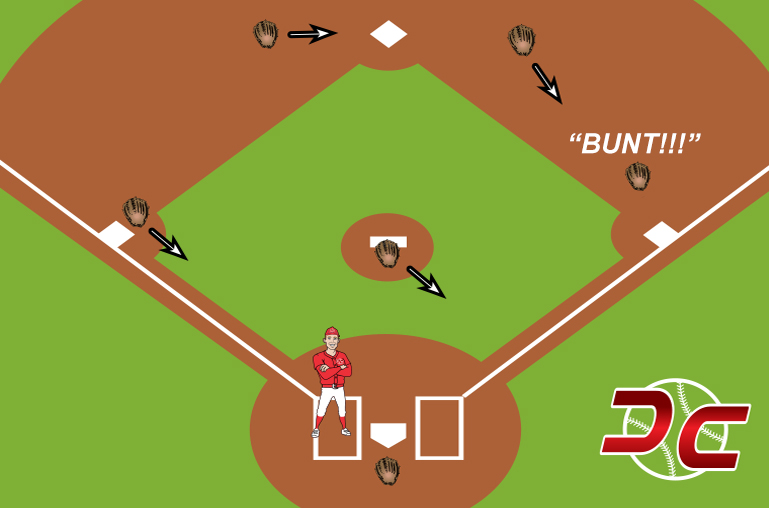
EXECUTION – To begin the drill, circle the athletes around you at the mound and describe the situation at hand. Explain the concept of a sacrifice bunt, the defense’s goal of cleanly recording an out, and talk through each defenders responsibility. Then, distribute athletes around the diamond at ALL infield positions (including pitcher and catcher if numbers allow). With athletes rotating after each repetition, EACH player will have the chance to play EACH position before completing the drill. Again, run this drill without baserunners and focus first on defending the bunt with only a runner at first base. Later, you can cover runners at both 1st and 2nd bases, and involve live bunting. Walk-Through – After explaining the play at the pitching mound and distributing athletes to each infield position, practice the defensive play at a walking pace so all athletes can see, hear, and feel the proper steps of execution. Rotate once or twice so that all are familiar with the steps of correct execution before adding pace and using the coaching verbals. Repetitions – Now, it’s time to practice. Begin each play by going around the diamond (position-by-position) and having each athlete shout out his role in defending the bunt with a man on first. Any extra athletes can wait in the dugout or in an on-deck area off of the diamond. Rotating after each play, each athlete will play each position before the drill is over. Coach: “First base, what is YOUR responsibility?” Athlete: Insert appropriate response here 1B – Hold runner, be vocal: “BUUUUNT” – Once the pitcher goes towards home plate and the hitter squares to bunt, the first baseman CAN charge. However, there’s value in having the pitcher cover the first base side of the diamond. Keep the first baseman back so the pitcher can field a bunt on that side. 2B – Cover first – Needs to be present to take throw if first baseman can’t get back to the bag. SS – Cover second 3B – Crash – With no need to cover the third base bag, the third baseman should be encouraged to charge hard! P – Cover 1st base side – Because the first baseman must hold the runner on, the pitcher’s responsibility is to field bunts on the first base side. C – Be Vocal, grab short bunt: “2, 2! or 1, 1!” – Because the catcher can see the entire field in front of him (and specifically the runner headed from first to second), the catcher must be vocal to direct the throw. DC KEYS Start Slow – First time through this drill, may only get through “man on 1st.” Eventually, team needs to cover “man on 1st & 2nd” Anticipate – “Think the game” and know your role before each pitch. Be Flexible – Number of players dictate if you’ll have P or C. Age and ability dictate if you’ll cover more than a runner at 1st base.
WATER BREAK (5min)

Love the Game One of Dan Keller's "Big 3" keys to advancing in the game Perhaps the biggest ingredient to success is to love the game. Baseball is hard....Read More
Notes:
Love the game, love playing with your teammates, cheer for each others success. Love and respect the game to be successful. Your going to have to work hard and practice, battle thru some adversity. Work together be there for eachother.