March 3 Practice
Team Name
Yard Goats
Location
Field 4
Date
03/03/2020
Start Time
5:30
End Time
7:00
EARLY ACTIVITY DRILL STARTS AT 5:15 (BELOW GOLD)

Wiffle Dodgeball is a wacky-fun drill. There's some speed/agility value, but beyond that... we're having fun here. With a keen eye placed on athlete-safety,...Read More
 Notes:
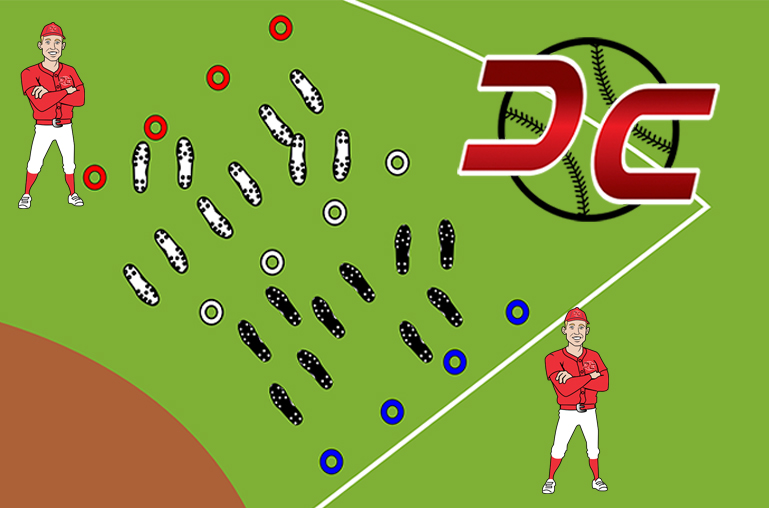
EXECUTION – Wiffle Dodgeball uses the existing Warm-Up Box (red, white, and blue cones), although the distances between the cones may be extended. One team competes on each side of the white cones (essentially the “half-court” line) and must stay in their box as the game plays out. Coaches can stand outside of the box (at half-court or on either end) to officiate and supervise the action. Use wiffle balls for safety purposes and establish your own detailed rules. If you have any questions, ask the kids! They are the experts at games like these, and they can decide what is most fun for THEM. Losing team does certain amount of pushups and play again. Suggestion, set the number of pushups as a multiple of how many players are still “alive” on the winning team. DC KEYS Need Loose Arms – This drill involves lots of throwing, often times at high intensity. Make sure athletes are all loose. Watch the Face – Penalties can be issued for high throws. Whatever it takes to keep the kids safe. Balance Teams – Work to balance the teams so competition is relatively fair.
PRACTICE STARTS AT 5:30 (BELOW BLACK)

~ SEE "EXECUTION KEYS" BELOW FOR AGE-SPECIFIC SUGGESTION LIST ~ The Dynamic Warm Up is today's warm up routine. Gone are the days of standing in a...Read More
Notes:
EXECUTION – DC uses a Warm Up Box, which is comprised of three red cones, three white cones, and three blue cones. Lines are two big steps apart, and red/white/blue cones are five-seven yards apart. In preparation for Warm Up, any equipment is placed at individual dugouts or lined up along a fence, and the athletes form three lines behind the red cones. Kids move freely from foul line to outfield (and back), working through various warm up movements. Emphasize quality of movement, quantity of repetitions, and keep movements varied. Finish with sprint work to ensure all athletes enter practice at 100%. This sprint work can involve a baserunning fundamental, thus falling under the DC practice absolute Early Baserunning. DC KEYS Get a Sweat – Look for sweaty brows and upper lips. Especially on cold days. “Warm up to throw” vs. “Throw to warm up” – Catchy phrase to explain the importance of warming up PRIOR to any catch play (even father / son catch). Safety First – Be careful of the backpedal, encourage next in line to catch the backpedaller. No crabwalks: Loads of stress on the wrist and forearm. Control Pace and Repetitions – Ex: up not out for ‘high knees’ or ‘butt kickers’ Early Baserunning – Be ready with what Early Baserunning fundamental you will finish the warm up with, for an athlete’s attention window closes quickly.

Feet in Concrete is a throwing drill typically done as part of the Throwing Progression (a routine to follow while warming the arm up). Depending on...Read More
Notes:
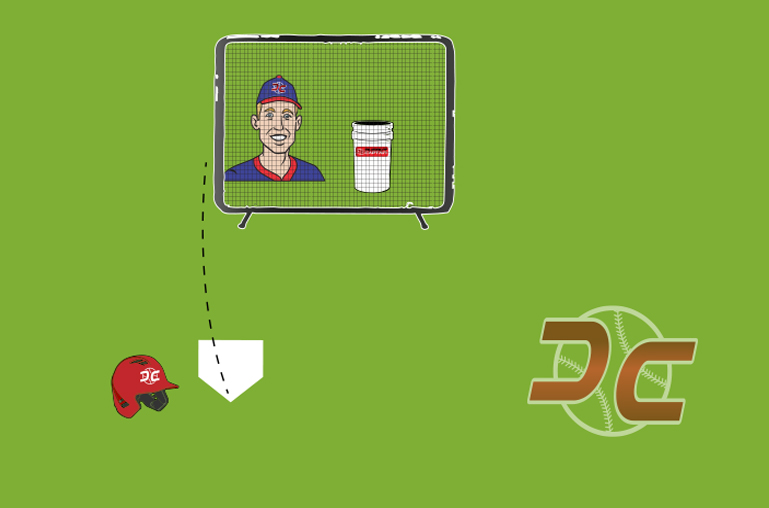
EXECUTION – Feet in Concrete is a standing, no-stride drill that allows the athlete to focus on both glove arm and throwing arm mechanics. The feet are anchored “in concrete” and thus can’t move. Emphasis is on getting good torso rotation, while keeping the glove in front of the body and using top-to-bottom arm action. Run this drill with broken movements first. Meaning, turn the body, extend the arms, and FREEZE! Athletes are to throw only on a coach’s verbal, and then also HOLD THE FINISH. Here, coach can check that the glove is still in front of the body (“chest”) and that the throwing arm has followed through to opposite thigh. Keep Feet in Concrete short and focused. Throwing is one of the harder skills to teach. It is best affected with consistent encouragement over many days, weeks, and months. Keep throwing focused and move to next drill when you feel the group wavering. Feet – Outside shoulders Knees – Slightly bent Glove – Extension (“reach”) and finish (“chest”) Arm – Top-to-bottom. Follows through to opposite thigh or knee (“tap, tap, tap”) DC KEYS Freeze to Feel Finish – Glove arm “shield”, throwing arm “tap, tap, tap” Careful No Collapse – Too much upper body follow through is no good Arm Action (advanced) – Top-to-bottom arm action is desired. Order of execution is (1) Hand, (2) arm, (3) body. Helps to put the ball on a downward trajectory (“tilt”).
Catch & Pop is a Quick Defense drill to drill the athletic movement of an infielder catching and getting rid of the ball. This movement is used all...Read More
Notes:
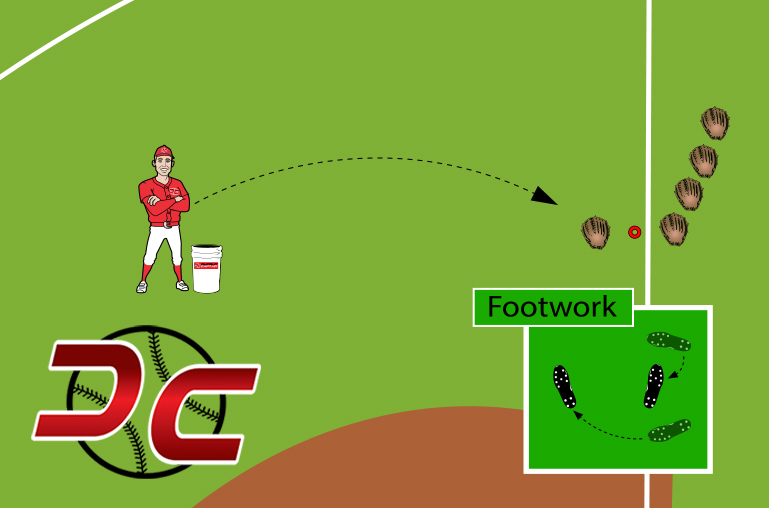
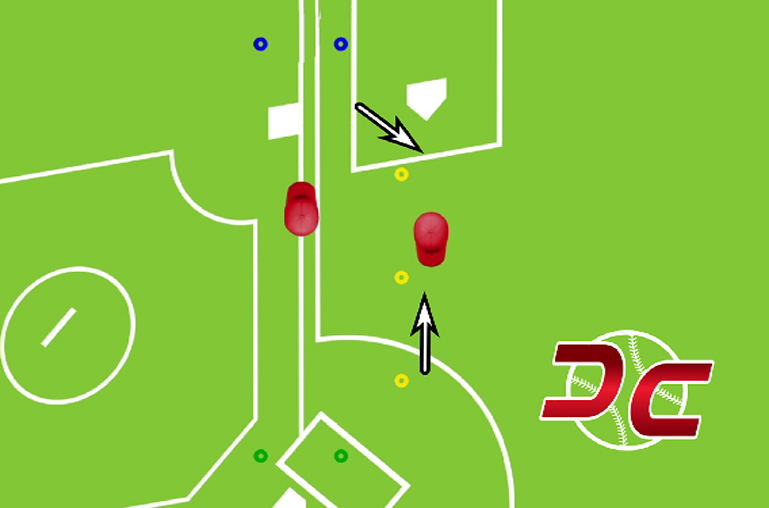
EXECUTION – Athlete receives the baseball, “pops” feet to throwing / power position, and then tosses ball back and and resets to receiving stance (feet outside shoulder, knees bent, glove up – thumbs together). Each athlete receives four Catch & Pop tosses, then rotates. Go through line 3-4 times. DC KEYS Loaded / Power Position – Feel the burn of the back leg as the body weight engages over the backside. The loaded/power position is used all over the field – hitters, pitchers, catchers, infielders, and outfielders. DC believes it to be the most important position in baseball, learning to use body to make a baseball move Tempo – slow early, catch first, “stay behind baseball”, poor throws result from hands dragging behind feet Modify – Add movement, ground balls, etc.
WATER BREAK (5min)
Stations (Groups rotate halfway through block)
Box Drills
 6:10-6:25
  15 Minutes
6:10-6:25 15 Minutes
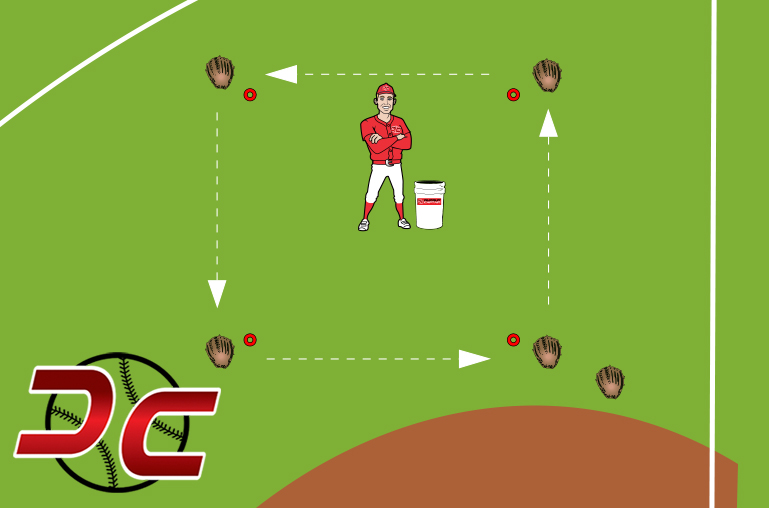
Movements include: Catch & Throw Left – Simple catch play. Compete for # of clean throws in a row or in a certain amount of time. Catch & Throw Right – Involve the reverse pivot footwork to turn the “wrong way” and deliver the throw. Ground Balls – Field, separate, shuffle… then roll a ground ball to the next cone. Underhand Flip / Left – Stiff wrist, leave it high, toss a knuckleball. Underhand Flip / Right – Crossover with left foot to begin. Reverse Pivot / Right – Start from fielding triangle position. Backhand Flip – Throw the ‘C’, thumb under baseball. GB / Flip / GB / Flip – Left vs Across – Mix up the drill and create more realistic reps. Mix it up
How To Coach: Hitting #1
6:25-6:35 10 Minutes
6:25-6:35 10 Minutes
Group – Start the drill by having each group member take their hitting stance at a cone. Place six cones in a semi-circle, with ample room for each to practice their swing. Stand in front of the group and explain the way the drill will be conducted… and then get into instruction (see below). Next, move inside the cage or over to the catch net for individual swings. Individual / Broken Swings – Each athlete rotates through the ‘live’ hitting area individually for 5-8 swings. Initially, athletes are to execute proper fundamentals using freezes and holds to see / feel / experience the correct technique. Adjust number of swings depending on the size of the group. If needbe, assign live, on-deck, and ‘in-the= Individual / Live Swings – Continuing to rotate through individually, athletes are to apply instruction to live swings. EXECUTION / INSTRUCTION – HTC Hitting #1 utilizes broken movements early. This means, freezing after taking a stride/load (position #1 in DC’s hitting system). The focus of this drill is getting to a strong and athletic stride position. Coach Malec consistently refers to this as an athletic base and uses the analogy of stretching a rubber band. Start – Begin individual swings with the athlete’s feet close together. The ‘narrow feet’ feeling is distinctly different than what the athlete feels after the stride. Step / Stride – Stride and load out to an athletic base. This is the “rubber band feeling,” which is be more heavily emphasized in Part #2 and #3 Push Test – Use the push test to check for stability. Athlete should be strong at this ‘loaded’ position. Swing & Finish – Once the athlete has passed a stability test, instruct the athlete to swing aggressively and hold the finish.
BP Reps: Front Toss
6:35-6:45 10 Minutes
6:35-6:45 10 Minutes
There are three main execution variables: Format – Drill can be run in a cage, bullpen, open grass area… virtually anywhere. Location – Soft Toss allows for ball to be thrown inside, outside, up or down. Material – Straight forward, freezes (take arm back and fake a toss), change-up toss (higher ball flight, unexpected to the batter) DC KEYS Instruction – Soft toss is appropriate for all hitters. On-deck batter can stride & load in rhythm with coach’s toss. Coaching Opportunity for Success – Don’t need to be hitting coach to keep athletes busy and get swings! Move quickly, involve a couple different rounds of exeuction. Broken Movements – Take the hand back, wait for a stride and load, then continue with toss for athlete swing. Later, when going full speed, mix in a fake toss and freeze! See if the athlete stays “loaded” or lunges forward with the hands and body.
WATER BREAK (5min)
Home-to-First coaches the correct way to run through the first base bag. As part of Baserunning or Conditioning, this drill can be run near the end...Read More
Notes:
EXECUTION – Line up the kids between two side-by-side cones, or against the fence to first coach up Home-to-First fundamentals: Front Edge – Hit the closest part of the base. This is a race, try to get there first!! Either Foot – Hit the base in rhythm without breaking stride. Break Down, Look Right – Athletically stop the body with short choppy steps, looking to the right for an overthrown baseball. Once repetitions begin, each athlete takes a turn. Start in the batters box with a swing (no bat). Encourage max effort and clean execution of the three keys listed above. Get through the line 2-3 times quickly before moving on to other baserunning drills or wrapping up practice. DC KEYS Goal cones ten feet past 1B – Place two cones 10-feet beyond the base to keep the athletes running hard THROUGH first base. Kick dirt on coach – Encourage breaking down by standing between Goal Cones. Kids get to kick dirt on coach! Fence line cones for return – Place cones next to fence that athletes must stay along while returning to line near home plate. Avoid collisions!
"Confidence comes from being prepared."
– John Wooden
SELF CONFIDENCE
 Confidence is earned: Hard work = Improved skill = Confidence
- Team Culture - Expect to Win vs. Not to Lose
- Look the Part - Posture, Body Language, Self-Talk